|
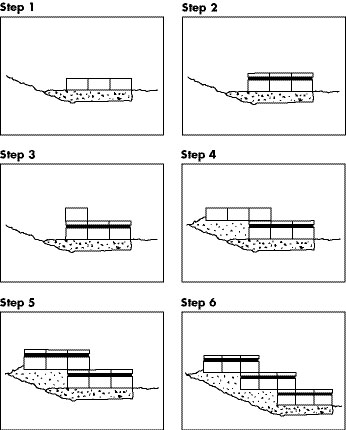
1. Dig a basin into the slope of your grade change approximately 16 inches deep and about 12 inches wider than the planned width of the steps. Only dig 3 inches below grade at the lowest point of the steps (the base of the first riser).
TIP: Build your paver projects for the steps out. Fill the bottom of the basin with 3 inches of very thick concrete. Place three rows of Rumbled Wall on the mixture to the desired with. Anchor Windsor Stone® can be used but each void between the stones would have to be filled with mortar.
2. Mortar set three rows of Holland Stone™ pavers on the surface of the Rumbled Wall in the soldier course pattern. Be certain that you have pre-designed the width so the pavers modulate to the wall stones.
3. Fill the back of this first structure with concrete, level to the back of the basin. While the mixture is stiffening but still workable, lay one row of Rumbled Wall on top of the back row of Holland Stone™ pavers.
4. Add two more perfectly level rows of Rumbled Wall behind this first row in the same configuration as your initial layer of Rumbled Wall.
5. Mortar set the Holland Stones™ just like you did in Step #2.
6. This can be repeated to attain almost any height. When youÆve completed your top step begin your paver project from the last row of soldier course Holland Stone™ outward.
|